Bug? - Create Style Button only choosing single selected element

Hi guys. I’m Fez, new here.

I’m not new to Bootstrap, I’ve successfully written and deployed multiple websites using BS4 and a text editor, so recently finding Bootstrap Studio seemed like a godsend. I’m just playing around with getting used to the BSS workflow, as using a GUI is far quicker than just constantly typing code, BUT I’ve hit a small stumbling block while learning, and following the youtube tutorial videos to get familiar with the software.

For example, I’m watching the youtube video on recreating the apple website. Every time the author clicks the “create” button, used to add a new css style rule in styles.css, HIS version grabs every class and ID of the element he has selected.

When I do it, I just get a single bare element.

Let me elaborate:

Going to [Creating Apple's Website in Bootstrap Studio 4 (Tutorial) - YouTube]
You’ll see he selects the navbar column manually on the visible page, hits “Create” and the styles.css code block adds the following to his code block:

.navbar.navbar-dark.navbar-expand-md.fixed-top.bg-dark

If I do the same thing, either by selecting the navbar from the visible page, OR the pertinent line of HTML code, I only get:

nav

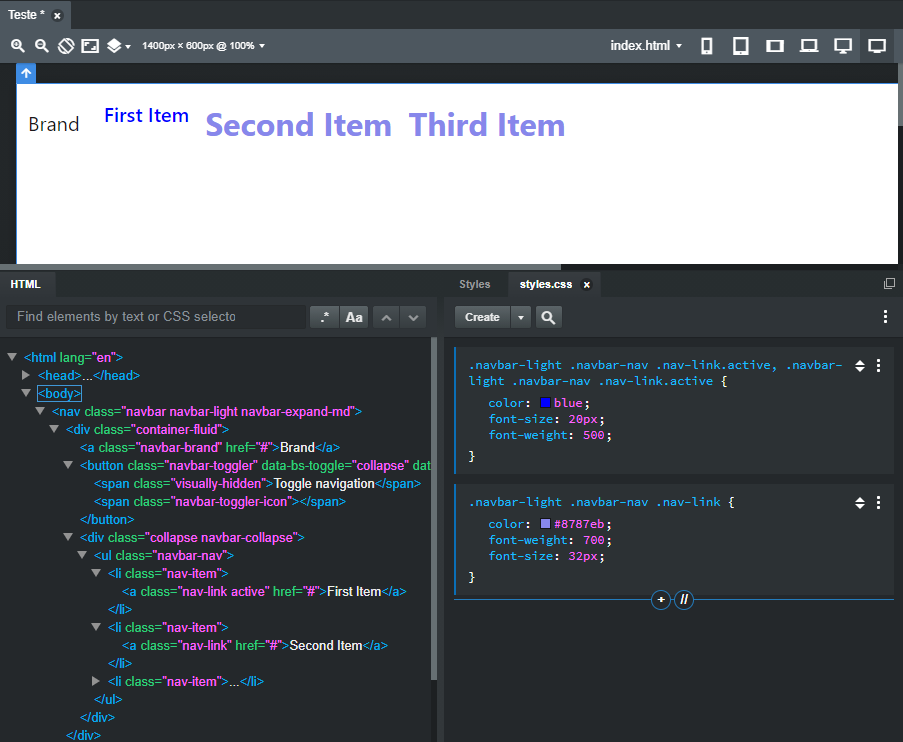
And the same applies to the next portion of the video, where the author clicks the 1st link, clicks the Create button again, and gets:

.navbar-dark .navbar-nav .nav-link

Whereas where I do the same actions, OR I select the correct line in the HTML code, I only get:

a
as my code block element to assign a style to.

So while I do find the drag and drop functionality of BSS to be thoroughly excellent, I did want this to streamline my css styling, but having to manually type them all in is slowing me down. Am I doing something wrong? I’ve attempted to recreate the apple video steps on both version 5.1 and 4.6 of Bootstrap. I’m currently using version 5.8.6 of BSS.

I completely understand that the video IS dated now, and there are visual differences between the version of BSS used in the video and the version I’m using today. I can work with that. It’s the inherent difference in function of the create button that’s throwing me off.

A little help guys?

*edited for formatting

1 Like

First, welcome to the forums!

Those videos are pretty old. I think they might be making new ones but I’m not sure.

I would suggest going through the docs instead as they have recently been updated quite a bit.

Holler again if your answers aren’t there or you have other questions.

Also, a lot of the classes can be added via the options pane, top right corner. Much of the bootstrap code is toggled there. The docs should help some with these too.

Thanks jo-r.

Already read the documentation, which doesn’t answer what I’ve posted.

TL:DR;
Clicking the create button in the CSS Editor window only grabs the element and none of it’s classes in the code block that’s created. I have to manually type all classes and id’s into my custom css code blocks.

I’ll try and work with you on this so bear with me as I’m trying to figure out exactly what you’re trying to do.

First let me say that this app is not a 100% drag and drop, it’s more like 60/40 with the 40 being what you’ll need to do with CSS. Always dependent on what it is you want to accomplish.

I have typed and deleted like 5 times now, I’m not really sure how answer because I’m not sure what it is you’re doing.

When you click an element it shows you the classes that are already applied, within the Attributes panel below the HTML panel. If there are no classes already applied (in other words you started from scratch and put a “div” in that has no attributes yet) then all it can do is put the “div” in as the class name for you to add attributes to.

Here’s how the system basically can work well for you without typing a lot. It’s a little weird at first, but if you want to work this way and not type classes yourself then this is the best way to go, a little bit more drag and drop-ish.

  1. Use the Arrow at the right of the Create button to choose a CSS file for your newly created classes to go into. Change this as necessary, but get in a good habit of this as it clears these settings upon closing the app so you’ll need to do these again.

  2. Create your class by hitting the Create button, or by clicking between the classes in a custom CSS file and clicking the blue line that will help you create classes or comments,.

  3. Now from here when you want to assign any styles you do via the Appearance tab, you click the pull-down menu that defaults to Style Attribute (inline) and choose the class you want to edit or add attributes to.

So say you add a div somewhere in your page, you then select the div in the visual panel and then pull the menu down to select it there.

  1. Now in the Appearance tab there are a lot of bells and whistles you can use for your styles. Anything you change there will be applied to the class you have selected at the top of the Appearance tab.

It sounds worse than it is, it’s only a few clicks to get it started each session and then just change the style attribute drop-down selection as you change component selection so the next things you change in the appearance tab are then added to that newly selected component.

The docs cover “some” of this, but they don’t explain in that section of the Docs how you should choose the file you want to use first. If you don’t, it will go to the last file chosen, even through sessions, so if you chose a file 6 sessions ago, the classes are still being added to it. If you don’t choose at all, they all go inline.

Hope that makes sense and if that doesn’t answer your question please let me know. It’s easier than it sounds.

I think there’s a failure to communicate from me, or your reading comprehension.

I understand everything that you’ve written in an attempt to help me. I get it. Thank you. I know how to apply classes and id’s in the html attributes pane, I understand how to change styles of things using the UI, or just typing it into a new code block in the CSS editor pane. I don’t have an issue genererally USING the software, it’s not complicated.

My issue is the discrepancy between how the create button on the CSS code block editor behaves FOR ME, versus what I see the user in the video tutorials doing on multiple videos. Please, if you have to reply jo-r, read what I’ve actually written.

I’ll write my singular boggle once more, for clarity:

I create a div, and give it some classes “col-4 dark mt-1” (picked at random as an example)
So in html code it looks like this:

div class="col-4 dark mt-1"

Now, when I click that div in the html window, then move my mouse over to the CREATE button at the top of the css editor window, I get a new code block in the CSS style editor that just says

div {
}

Whereas I’m expecting it to look like this:

div .col-4 .dark .mt-1 {
}

does this make sense?

Wow rude much? I’ll just not bother with wasting my time with you from this point on ok?

2 Likes

I appreciate that, thank you.

@fez I take it that you are using bs5, this will only give nav when you create a style
if you are using bs4, then it will give the full .navbar.navbar-light.navbar-expand-md

Another suggestion, when someone like @jo-r is trying to help you in their spare time, or more likely time they could be using to make money, treat them with respect, instead of being a ****

@richards is this normal behaviour of the create button between versions of Bootstrap? It isn’t documented anywhere, and is rather unhelpful. If so I’ll stick to BS4 versions in BSS in future.

As for the reply, I do apologise @jo-r , but getting a copy paste replies as if I’m a complete idiot is a little condescending, and didn’t actually address anything I wrote. I’m sorry I got snippy. We’re all here to make money, and this is little hiccup is occupying time I could be spending just getting on with pumping out websites for money.

I’ve been refreshing this page hourly during waking hours to see if someone who actually would answer my question would weigh in since I created the post, and @richards you posted the first viable answer to it. Even though it doesn’t explain why, it gives me something to work with.

I didn’t copy paste a single word of that post. I spent my time typing every single word, so maybe you should ask first before assuming I’m just thinking you’re stupid. I didn’t think that at all. Either way, this is my last post in here, I’ve been insulted enough.

@jo-r hold on. How did I insult you?

I’ve asked a question, THREE times now in this thread. At no stage did you answer it. As if you never once read what I had written.

I don’t mean to be rude, but I’m not here to make friends, it’s the help section of the forum. I need help with a software issue. I came here because nothing in the documentation, nor the video tutorials pertains to my issue, HENCE the post here. I had an objective, and while it’s truly commendable you’ve taken the time out of your day to reply, it’s been a completely wasted effort. You haven’t helped. I’m sorry you don’t like to hear that, but it’s simply a fact.

We’d both have been better off if you hadn’t replied at all. Now I’m in the shit because I’ve replied 3 times to you, rewriting my issue each time so you can better understand, thinking I’d phrased my issue incorrectly, and at no stage have you even come close to giving me an answer to my question, at all, and I’m getting irritated.

I’ll say it one more time. I am sorry if you’re offended. Wasn’t my intention. But we’re both just wasting time here, and I’d rather someone who actually knows about the issue could weigh in. Like one of the developers.

I came across the same situation, it could be a bug, in this case the best way is to report to support by sending a message, they always respond and in case of bug, they update the bss correcting it, otherwise they give an explanation.

1 Like

It may be that I don’t know how to use BSS, but I think it’s a defect.

Just to complement it, when I clicked on the create css button, in navbar, none of the created options worked, I noticed the same in other components, that is, I really believe it to be a defect, a bug.

Only the last option with the complete classes yielded results.

According to the example below.

.navbar-light .navbar-nav .nav-link.active, .navbar-light .navbar-nav .show>.nav-link
.navbar-light .navbar-nav .nav-link

1 Like

Actually, this is not a bug, but a feature. It’s simply about generating cleaner code and avoiding bad work practices. Sooner or later you will regret overriding Bootstrap default classes, so when you click on “Create” they will be ignored right from the start. You can, however, give an element its own class, which will be taken into account when you hit “Create”. But if an element contains only default classes, just the tag name remains. Hope that helps!

div class=“col-4 mt-1” results in div

but

div class=“col-4 mt-1 test” results in .test

1 Like

Oh dear, I hope that’s not true @thedani because that means that you better know you’re going to be applying a custom styling rule before you go too far down designing a page.

Imagine for example, that I make a product page. This product page has (dunno, pick a large number) 50 images on it, nested within divs that have bootstrap 4 class names applied.

Now I decide, “y’know what, those pictures are too big/small/need rounded edges”, and I click the 1st image, of the 50 images on the page, and I get a
img{
}
codeblock in my custom css file. Now, I either need to apply css selector rules myself, using the bootstrap class names as my targeting for the element (which already used to work), OR I need to give that image a unique to those images class name to apply my styling.

See the issue? I’m either retroactively applying that new made up classname to all 50 images, or I’m manually writing the css class selector rule myself for all 50 images. The class selectors are already there, but we’re ignoring them why? You might (and often are) applying a styling rule that has ZERO bearing on the class names default styling in the first place, for example, an img inside a col-6 mx-auto rounded div that you want all of them to be max width: 100px. At no stage is my css selectors for bootstrap being overridden with my styling rule. I’m applying a styling rule to all bootstrap elements within that given criteria.

Certainly not how the video tutorials present the workflow. And I can understand a philosophy behind “it’s a good workpractice to make new classname for stuff you want to custom style”, but it’s also a double edged sword, meaning you need to have that in mind with every element you put on a page, because god forbid you go back and revise elements on a page.

As it’s presented now, it means ANY time you click create, you’re applying a style to ALL elements of the default name that have no custom classes. Massive loss of functionality to the “select element, click create button” workflow.

you would do something like

<div id="products">
   <div>
        <img src="x1">
   </div>
 <div>
        <img src="x2">
   </div>
 <div>
        <img src="x2">
   </div>
</div>

and then css:

#products {whatever styles you want for the product wrapper}
#products img {whatever styles you want for the image}
1 Like

Thank you for starting this thread! Unfortunately this is not a bug, but an intended change.

As you’ve noticed, in older versions of the app all the class names of the element were copied in the selector when creating a css block. The idea behind this was to be convenient for the user and make it easy to write CSS that overrides other code that might affect the element.

However we’ve received a lot of complaints about this behavior over the years. Mainly that this is almost never the selector that users want, and stylesheets become an unreadable mess very fast. So we decided to improve how this is handled.

In Bootstrap 5 designs, the app uses either the element id, user class names or the tag name, in that order. Framework class names (like .navbar-light, .btn etc) are ignored in selectors. If you wish to write CSS for a specific element, you can give it an id or a class name and it will be placed in the selector.

There is no way to update our old videos unfortunately, but new ones are coming.

1 Like

A saying here in Brazil, “living and learning”!
Now I understand how it works and I had already done the entire video tutorial and seen the documentation, I hadn’t noticed this detail in them.
Thanks for clarifying.

Thanks for the reply martin.

So with this change, any and all elements you apply css code to MUST include a custom class to get picked up by the create button.

I see a lot more classnames written in the future. Sigh.

@fez
you can copy the css block via the dots in styles tab

1 Like