I wasted days and had a lot of work trying to make an Offcanvas navbar by building it from scratch.
That’s when I remembered the bootstrap website, Get Bootstrap, I did a search, got exactly what I needed, copied the code from the website and returned to the project in Boostrap Studio.
I inserted a custom code, pasted the code I copied on the bootstrap website and converted it to a component, that’s it, problem solved in a few minutes!
So here’s a tip for friends who still waste time trying to build something in the program.
My biggest advice, especially for saving time has got to be the handy utility classes Bootstrap comes with. Do you keep on manually making classes to add spacing before or after an element? Stop, and check this out: Spacing Utility Classes, even lets you choose different spacing on different screen sizes!
Bootstrap also has some amazing form validation you can use, that isn’t enabled in Bootstrap Studio by default, next time you make a form, read this in full, its worth it and so easy! Form Validation JS
Ever wanted to have things in a different order on mobile? Like, you want to have a login button in your navigation in one position on desktop, but another on mobile? Don’t make two elements, then hide them on different screen sizes, use the amazing Order Utility Class!
This are just a few of Bootstraps great, but often overlooked features when people start out using the framework. I use them all the time, and felt like an idiot I didn’t know about them sooner. Now I always challenge myself to write as little custom CSS as I can for each project!
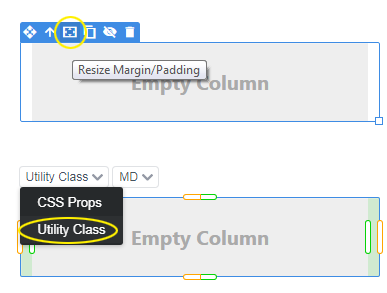
Not sure if everyone knows this, but Bootstrap Studio allows you to apply the responsive margin and padding utility classes through the visual UI. You just have to click the Resize Margin/Padding icon and from the dropdown choose “Utility Class”